
Notice
Recent Posts
Recent Comments
Link
| 일 | 월 | 화 | 수 | 목 | 금 | 토 |
|---|---|---|---|---|---|---|
| 1 | 2 | 3 | 4 | |||
| 5 | 6 | 7 | 8 | 9 | 10 | 11 |
| 12 | 13 | 14 | 15 | 16 | 17 | 18 |
| 19 | 20 | 21 | 22 | 23 | 24 | 25 |
| 26 | 27 | 28 | 29 | 30 | 31 |
Tags
- HTML
- JavaScript
- CSS
- React Kakao map
- es11
- nextjs
- spread operation
- 카카오맵
- React #Hooks
- 프로그래머스
- Python #Baekjoon
- Default parameter
- Python
- es6
- optional chanining
- Template literals
- Python #CodeUp
- Next
- firebase
- HTML #CSS
- css #html
- Hooks
- BOJ
- Redux
- react
- Nullish Coalescing Operator
- 카카오맵 api
Archives
- Today
- Total
거북이개발자
[카카오톡 클론코딩]카카오톡 클론코딩 로그인창 본문
1. 목표
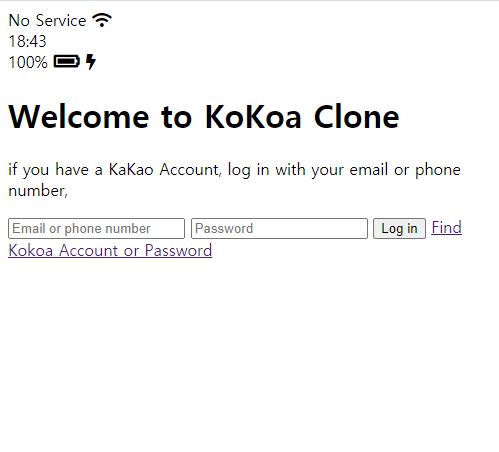
오늘은 로그인 창을 만들어 볼것이다. 목표는 밑의 사진이다.

2. HTML
<!DOCTYPE html>
<html lang="en">
<head>
    <link rel="stylesheet" href="css/styles.css">


    <meta charset="UTF-8">
    <meta name="viewport" content="width=device-width, initial-scale=1.0">
    <title>Welcome to Kokoa Talk</title>
</head>
<body>

    <div class="status-bar">
        <div class="status-bar__column">
            <Span>No Service</Span>
            <i class="fas fa-wifi"></i>
            <!--to do wifi Icon-->
        </div>
        <div class="status-bar__column">
            <span>18:43</span>
        </div>
        <div class="status-bar__column">
            <span>100%</span>
            <i class="fas fa-battery-full fa-lg"></i>
            <i class="fas fa-bolt"></i>
            <!--battery icon-->
            <!--lighting icon-->
        </div>
    </div>

    <header class="welcome-header">
        <h1 class="welcome-header__title" >Welcome to KoKoa Clone</h1>
        <p class="welcome-header__text"> if you have a KaKao Account, log in with your email or phone number,</p>
    </header>

    <form id="login-form">
        <input type="text" placeholder="Email or phone number"/>
        <input type="password" placeholder="Password"/>
        <input type="submit" value="Log in"/>
        <a href="#">Find Kokoa Account or Password</a>
    </form>


    <script src="https://kit.fontawesome.com/a9eb1f10be.js" crossorigin="anonymous"></script>
</body>
</html>
위의 코드가 총 HTML의 코드이다. 자세히보면 크게 3구간으로 나뉜다고 볼 수 있다.
상태바부분, 환영하는 글 부분, 정보입력 및 링크부분
HTML만 적용했을시의 결과물이다.
(1) 상태바부분
   <div class="status-bar">
        <div class="status-bar__column">
            <Span>No Service</Span>
            <i class="fas fa-wifi"></i>
            <!--to do wifi Icon-->
        </div>
        <div class="status-bar__column">
            <span>18:43</span>
        </div>
        <div class="status-bar__column">
            <span>100%</span>
            <i class="fas fa-battery-full fa-lg"></i>
            <i class="fas fa-bolt"></i>
            <!--battery icon-->
            <!--lighting icon-->
        </div>
    </div>
이부분이다.
아이콘이 새로운 부분인데
Font Awesome
The world’s most popular and easiest to use icon set just got an upgrade. More icons. More styles. More Options.
fontawesome.com
여기서 많은 아이콘을 이용가능하다.
또한 class설정 이름을 이렇게 구체적으로하면 나중에 크기가 커질때 유리하다.
(2)환영하는 글 부분
 <header class="welcome-header">
        <h1 class="welcome-header__title" >Welcome to KoKoa Clone</h1>
        <p class="welcome-header__text"> if you have a KaKao Account, log in with your email or phone number,</p>
    </header>
코드의 가독성을 위해 <header>로 설정했고
class를 구체적인 명으로 설정해 주었다. 그외에는 노멀한 부분이다.
(3) 정보입력 및 링크부분
    <form id="login-form">
        <input type="text" placeholder="Email or phone number"/>
        <input type="password" placeholder="Password"/>
        <input type="submit" value="Log in"/>
        <a href="#">Find Kokoa Account or Password</a>
    </form>
딱히 특별한 부분은 없다. id설정을 했는데 이것은 나중에 딱히 form태그를 쓸일이 별로 없기 때문이다.
2. CSS
@import "reset.css";
@import "status-bar.css";
@import "variable.css";

body{
    font-family:-apple-system, BlinkMacSystemFont, 'Segoe UI', Roboto, Oxygen, Ubuntu, Cantarell, 'Open Sans', 'Helvetica Neue', sans-serif;
}

.welcome-header{
    margin: 90px 0px;
    text-align: center;
    display: flex;
    flex-direction: column;
    align-items: center;
}

.welcome-header__title{
    margin-bottom: 20px;
    font-size: 25px;
}

.welcome-header__text{
    width: 60%;
    opacity: 0.8;
}

#login-form{
    display: flex;
    flex-direction: column;
    margin:0px 30px;
}

#login-form input{
    border:none;
    padding: 10px 0px;
    font-size:18px;
    border-bottom: 1px solid rgba(0, 0, 0, 0.2);
    margin-bottom: 25px;
    transition: border-color 0.3s ease-in-out;
}

#login-form input:not([type="submit"]){
    border-bottom: 1px solid rgba(0, 0, 0, 0.2);
    transition: border-color 0.3s ease-in-out;
}


#login-form input::placeholder{
    color:rgba(0, 0, 0, 0.4);
}

input:focus{
    outline:none;
}

#login-form input:focus{
    border-color: var(--yellow);
}

#login-form input[type="submit"]{
    background-color: var(--yellow);
    cursor: pointer;
    padding:15px 0px;
    border-radius: 5px;
    border-color: var(--yellow);
}

#login-form a{
    text-align: center;
    text-decoration: none;
    color:inherit;
    font-size: 13px;
}
.status-bar{
display: flex;
justify-content: center;
padding: 5px 3px;
}
.status-bar__column{
width:33%
}
.status-bar__column:first-child span{
margin-right:5px;
}
.status-bar__column:nth-child(2){
display: flex;
justify-content: center;
}
.status-bar__column:last-child{
display: flex;
justify-content: flex-end;
align-items: center;
}
.status-bar__column .fa-battery-full{
margin:0px 5px;
}전체 css와 status-bar css로 나눠서 했다.

css까지 마친 결과물이다.
'Web > HTML & CSS' 카테고리의 다른 글
| [HTML] DOCTYPE란? (0) | 2021.04.05 |
|---|---|
| [카카오톡 클론코딩]카카오톡 클론코딩 틀완성(1차 완성) (0) | 2021.01.09 |
| [카카오톡 클론코딩]카카오톡 클론코딩 목표 (0) | 2021.01.06 |
| [카카오톡 클론코딩]CSS 고급 문법 (0) | 2021.01.05 |
| [카카오톡 클론코딩]CSS 기초 문법(3) (0) | 2021.01.05 |
'Web/HTML & CSS' Related Articles
more


Comments